While sometimes time spent in the kitchen is relaxing and enjoyable (think cooking warm, hearty stews on a cold winters day), sometimes we just want to get things done as quickly as possible.

This article compiles 80 of the cleverest, most ingenious, “why didn’t I think of that” ideas for becoming the most efficient and most talented kitchen whizz ever!
Fruit Hacks!
Fresh fruit is juicy and delicious! It’s also often slippery, ornery, and filled with seeds. Use these clever hacks to bend stubborn fruits to your will!
1. Ripen fruit faster. – Drop unripe fruit (green bananas, crunchy peaches, rock-solid plums) into a paper bag and fold down the top. Ethylene gas emitted by the fruit will be trapped inside the paper and speed up the ripening process.
2. Ripen fruit even faster. – Bananas emit more ethylene gas than other fruits and all fruits emit more gas the riper they are.(source) Want to eat that pear for breakfast but afraid you’ll break a tooth? No problem! Just toss it in a bag with a ripe ‘naner’. You’ll have pear juice dripping down your chin in no time!
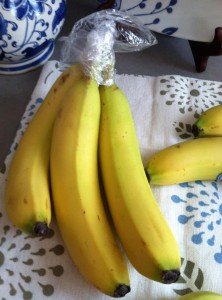 3. Extend the life of your bananas. – Cover the stem-end of your bunch of bananas with plastic wrap. Each time you go to remove a banana, just unwrap the plastic and replace. This will keep your fruit from browning for an additional three to five days.
4. Extend it even further. – Separate your bunch and wrap each individual banana with its own piece of plastic wrap to maximize ripening time without having to freeze or otherwise alter the flavor of your precious ‘naners.’
5. Peeling stubborn bananas – Slightly-green banana got you twisting, wrestling, and otherwise mangling the stem-end of your fruit? Try peeling it from the bottom up instead. The skin there usually isn’t as thick and is much easier to break into.
6. Peeling stubborn citrus fruits – Sometimes the rind comes right off and it’s like unwrapping a juicy, delicious, citrusy present. Other times it chips away in an endless pile of tiny, frustrating bits of peel. If you’re like most of us and prefer option number one, roll your orange around on a hard surface for thirty seconds or so to soften up its skin before digging in. Works like a charm!
Don’t throw your citrus peels away! Here are twenty clever ways to use them.
7. More juice from citrus fruits – Roll limes, lemons, oranges, grapefruits, etc on a hard surface for a minute or two before squeezing the juice out. Not only will you get more juice this way, the fruit will also be easier to squeeze.
8. Even more juice from citrus fruits – Insert the tines of a fork into the juicy flesh before squeezing. This will help to break up the fruit, releasing even more juice with less work from you!
9. Remove seeds and pulp from juice – Lay a piece of cheesecloth into the bowl or glass with the corners draped over the sides of the container, insert juice, then slowly lift out the cloth. The liquid will drain through the cheesecloth while seeds and pulp will be trapped for removal. (If you don’t have cheesecloth, this also works really well with a pair of clean stockings or nylons!)
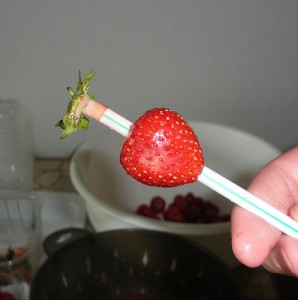 10. Easy coring for strawberries – Use a straw to remove the white, flavorless cores from your strawberries. Press the straw into the bottom of the strawberry, straight up through the middle, and out the top. When the straw breaks through the stem-end of the berry, it should take the core with it every time.
11. Easy pitting for small fruit – Position cherries, grapes, or other small fruits right-side-up on top of an empty bottle, poke straight through the fruit with a straw, watch the pit or seeds fall into the bottle, repeat.
12. Easy pitting for large fruit – Cut plums, peaches, and nectarines in half length-wise. Grip the two halves and twist in opposite directions then use your thumbnail or the tip of a butter knife to pop the pit.
13. Keep cut fruit from browning. – (the sour way) – Fill a small spray bottle with lemon juice and spritz the cut sides of apples, avocados, etc. This will prevent the oxidation that turns fruit flesh that less-than-appetizing shade of brown.
14. Keep cut fruit from browning. (the sweet way) – Use a 1:2 ratio of honey and water for the same effect minus the sour flavor of lemon.
15. Instantly chill wine without diluting it. – Slide a few grapes onto a toothpick and put it in the freezer. Later, you can use this as a pretty garnish that will chill down your wine without diluting it.
16. Clean fruit without soap. – A mixture of baking soda and water (just enough to form a paste) works wonders to remove dirt and pesticides from the outside of fruit.
Veggie Hacks!
Don’t hack up your veggies. “Hack” your veggies. Check out these great tips for prepping fresh vegetables that will make your life easier (…at least in the kitchen.)
17. Easy pitting for avocados – Place the half with the pit skin-side down on a cutting board, make sure fingers are clear, lightly but firmly tap the blade of your knife into the exposed pit, then twist to pop it out. (Remember: You can grow your avocado pit in a jar of water for some great educational fun!)
18. Easy peeling for avocados – Cut avocado into quarters or slices. Run the tip of a sharp knife under the corner of the skin on each piece then peel the rind right off. Easy-peasy!
19. Keep tomatoes fresher longer. – Don’t refrigerate them. (That actually makes them rot faster!) Simply store tomatoes stem-side down to keep air and moisture from escaping through the cut stem.
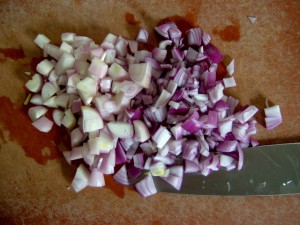 20. Don’t cry over cut onions. – Freeze the onion before you chop it up. Note: You’ll want to cook the onion right after you do this as onion pieces will become soggy once they begin to thaw.
21. Keep cut potatoes looking fresh. – After you’ve prepped your taters, drop the cut pieces into a bowl and cover with ice water until you’re ready to cook them. This will prevent oxidation from discoloring the exposed potato flesh.
22. Remove potato skins the easy way. – Simply boil your taters for a few minutes to soften up the skins then drop them in ice water. The skins will separate easily. Goodbye messy potato-peeler!
23. Remove seeds from gourds the easy way. – Don’t mess around with a spoon. Instead, use an ice cream scoop. The shape of the scoop makes it much easier to hold onto the slippery seeds and connective tissue.
24. Remove corn kernels the easy way. – Position corn-on-the-cob point-down against the hole of a right-side-up bundt pan. Push the cob downward and let the bundt pan do all of the work. Bonus: the pan will also collect all of the corn kernels for you, saving you more time!
Herb Hacks!
Here are just a few time-saving tips for preparing finicky fresh herbs.
25. Easy peeling for fresh ginger – Don’t bother with a knife or potato peeler. Ginger skin will come off much easier if you use a spoon instead.
26. Easy peeling for fresh garlic – Freeze garlic cloves before trying to remove the skins. This makes them much easier to peel.
27. Easy peeling for fresh garlic – (continued) – Separate cloves from the bulb. Place them on a cutting board, position the flat side of a large knife or other hard surface against the top of each clove, and give it a good whack. The skin will fall right off.
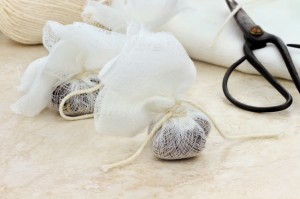 28. Easily remove woody herbs from food. – Want the flavor of rosemary in your pasta without the texture of pine needles? Don’t want to have to worry about fishing those bay leaves out of the soup? Not a problem! Drop the herbs into a tea ball and hang on the side of the pot. When you’re done cooking, pull it back out. (How easy was that?!)
29. Preserve fresh herbs without drying – Fill an ice cube tray with water, oil, or stock. Add chopped herbs and freeze. When you’re ready to use them, simply pop out as many cubes as you need and thaw them out.
Egg Hacks!
Show those tricky eggs who’s boss! Yes, there are enough hacks for dominating this one troublesome food that we gave them their own category!
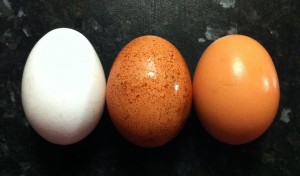 30. Check them for freshness. – Not sure how long that carton of eggs has been in the refrigerator? Can’t find an expiration date to save your life? Not a problem. Place your eggs in the bottom of a pot, fill with cold water, and observe. If they stay peacefully on the bottom, they’re still fresh. Any eggs that float to the top… not so much.
31. Drop eggs into water without cracking them. – Use a metal mesh strainer to get them safely to the bottom of the pot.
32. Easily separate yolk from white. – Use a plastic water bottle to suck up the yolk. Simply squeeze some of the air out of the bottle, position the opening over the egg yolk, and let the bottle re-inflate. This method may take a bit of practice to get right, but it’s far easier than the old fashioned method using the two halves of broken shell.
33. Easily remove shell fragments. – Don’t try to use a spoon or fork to get that stray piece of eggshell out of a bowl of raw egg. Use another piece of shell instead! Half of an eggshell is the perfect tool for quickly and easily catching those tiny slippery pieces, drawing them like a magnet and lifting them away without wasting much of the useable egg.
34. Preserve your whites. – Keep egg whites from spoiling long past their expiration date by freezing them. The easiest way to do this: Store them in an ice cube tray, one white per partition.
35. Easily peel hard-boiled eggs. – (the pretty method) – Add vinegar to the water while boiling. Vinegar will soak into the eggshells and break the chemical bond between the white and the inside of the shell.
36. Easily peel hard-boiled eggs. – (the not-so-pretty method) – If you need to make a big batch of egg salad in a hurry, put your hard-boiled eggs in a lidded container and shake them up. The shells will come off in a jiffy, though it will also bruise up your egg whites a bit in the process.
Kitchen Storage Hacks!
Apply these clever hacks for storing food to keep your dry goods fresh and your left-overs in line!
37. Keep brown sugar soft. – Drop a piece of orange peel into an air-tight storage container with your brown sugar. This will keep the sugar from hardening and sticking together.
38. Soften up hard brown sugar. – Pop that brick of hardened brown sugar into the microwave next to a glass of water and turn it on. The resulting moisture inside the microwave will loosen up the sugar and make it pliable again.
39. Tame wild plastic wrap. – Store the roll in the refrigerator. Chilled plastic wrap is much easier to manage.
 40. Easily open stuck jars. – Stretch a rubber band around the lid. This will provide a good amount of extra traction to help you get the jar open.
41. Easily open stuck jars. – (continued) – If the rubber band doesn’t work, pair that technique with the old dish towel around the lid trick and try again.
42. Reusable “plastic wrap” – Don’t bother with cling wrap which is a one-use item. Instead, cover your left-overs with a shower cap to keep contaminants out and delicious food in.
43. Keep ice cream from becoming ice crust. – Position a piece of wax paper over the top of the container before you put the lid on it. This will form a better seal (like the one you peeled off when you first opened the carton) and keep out the ice crystals.
44. Extend the life of your nuts. – Once they’re exposed to air, nuts tend to go bad faster than when they were safe in their shells. Prevent this by putting them in the freezer. It won’t spoil the flavor, but it will keep the oils in the nuts from going rancid.
Cooking Hacks!
Use these hacks to make cooking look easy. Wow your friends, awe your relatives, and be the star of the kitchen this holiday season!
45. Easily skim away fat. – Once the fat separates and forms into little oily globules at the top of your stew or stock, use a couple of ice cubes to solidify the fat before trying to skim it away. Try wrapping two or three ice cubes in cheesecloth so you can easily remove them when you’re done. Or simply put them into your slotted spoon and run it around the surface of the hot liquid to solidify and catch the bits of congealed fat.
46. Easily slice soft cheeses. – Even if you don’t have one of those fancy string cutters, you can simulate the same effect. Use a piece of unflavored dental floss to slice through soft cheeses without squishing them.
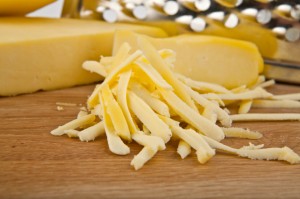 47. Grate cheese with ease. – For semi-soft cheeses, grating can be messy business. Freeze them for thirty minutes or so before shredding to make this job go a little more smoothly.
48. Make foamed milk without a steamer. – Fill a small jar up to halfway with milk, replace the lid, and shake well. Once the milk has expanded to about twice its starting volume, remove the lid and pop it in the microwave for thirty seconds or so. Your milk will be nice and frothy. No special equipment required!
49. Brew coffee sans coffee maker. – Add coffee and water in the same ratios you would use in a coffee machine into a pot and heat to boiling. Once the brew reaches your desired strength, remove it from the heat and let the grounds settle. You can then pour off the top or ladle coffee into cups.
50. Thinly slice meat with zero fuss. – Freeze the meat so that the outside is firm before you start slicing. This will keep your thin cuts nice and neat.
Baking Hacks!
It’s been said that baking is a combination of art and science. Use these hacks to become a master of both!
 51. Bake food without flipping. – When oven-baking items that instruct you to flip the food mid-way through cooking, simply place your baking sheet inside the oven while it’s warming up. Preheated baking sheets will cook food evenly and negate the need for flipping.
52. Easily slice cookie dough. – Use the same trick as for soft cheeses. A piece of unflavored dental floss will slice right through dough without smooshing it flat in the process.
53. Easy cutting for baked goods – Before you add batter to your baking pan, grease the pan, line it with parchment paper, then grease the paper too. After your beautiful baked goods finish cooking, let them cool and lift them out of the pan using the edges of the paper. Once your scrumptious creation is free of the baking pan, you can cut it more easily without having to fight with the sides and corners.
54. Substitute for muffin cups. – Say you get halfway through preparing muffins or cupcakes and realize that you don’t have enough muffin cups. Simply substitute parchment paper in their place. Grease the wells, line with enough paper that it sticks up out of the partition a bit (folding the sides to make them fit nicely), then grease the paper as well. These makeshift muffins cups pop out just as easily and look pretty spiffy, too!
55. Keep your measuring cup clean. – Before adding sticky liquids like honey, syrup, or dough to your measuring cup, coat it with a little butter or oil. This will help the sticky goo to slide out more easily, saving you time on the clean-up.
56. Soften butter fast. – Cut up your butter before softening. The more surface area you give it, then faster butter will warm up. Try cutting it into slices or grating it like cheese.
57. Soften butter faster. – Don’t have time to wait for those slices to soften up? There’s an easy hack for that, too. Toss the pads of butter into a plastic bag and flatten them with a rolling pin. They’ll be soft enough for use in no time flat. (Pun intended!)
58. Make makeshift buttermilk. – If you don’t have any on-hand, but you want buttermilk for a recipe, don’t bother going to the grocery store. Just add a little vinegar or lemon juice to your regular milk. It won’t have quite the same texture, but will have a similar effect on your baking.
59. Re-harden soft butter. – If you got a little carried away with the softening, make an ice bath for your buttery bits. Partially fill a medium-sized bowl with ice water and a smaller bowl with your too-soft and / or melted butter. Place the butter bowl in the middle of the ice water bowl and watch your butter become solid again.
60. Re-liquify crystallized honey. – Simply place the entire jar of chunky honey into a container of hot water. The crystals will melt in about ten minutes or so.
Kitchen Cleaning Hacks!
Keep your kitchen tidy with these time-saving hacks, so you can do less cleaning and more of everything else!
61. Remove cooking smells from skin. – Wash your hands in lemon juice, baking soda, or a mixture of both. These two common kitchen items quickly neutralize powerful smells like garlic oil and onion juice.
62. Clean out the coffee grinder. – Toss a few pieces of hard, stale bread into the grinder and turn it on for a second or two. The bread will absorb moisture, oil, and stray grounds. When you dump out the bread, it will take all of the coffee bits with it.
63. Clean out the coffee maker. – Over time, crud builds up inside the parts and pieces of a coffee maker. Fill the tank with equal parts vinegar and water, then turn it on. Repeat this process one or two times for really gunky machines. (Also, remember to remove coffee and / or paper filters first!)
64. Safely scrub wooden cutting boards. – Sprinkle coarse ground salt over the entire board then use half of a lemon in place of a scrub sponge. The salt will help to loosen stuck on food while the lemon soaks into and cleanses the wood.
 65. Safely scrub cast iron. – Using soap and water strips away the seasoning from the metal, causing it to rust. Instead, try scrubbing out your pots and pans with coarse ground salt to remove stuck-on food without damaging the metal.
66. Easily clean out your microwave. – Saturate a dish sponge with water and place it in the middle of the microwave. Turn the machine on for about a minute. The water will heat up and effectively steam-clean the inside of the microwave. Then, simply wipe away all of the loosened food particles. (This hack has the added bonus of disinfecting whatever sponge you use!)
67. Renew stained metal tools. – Mix equal amounts water and white vinegar. Use this solution to soak and scrub metal tools and utensils. This works great on metal tea kettles and coffee pots!
68. Refresh wooden utensils. – Boil stained or really dirty wooden cooking implements to remove contaminants then lay them out in a sunny spot to dry.
69. Easily clean out your oven. – Boil water in the oven to loosen stuck-on food particles. Then scrub with a crumpled piece of used aluminium foil to remove the gunk. Aluminium is soft enough that it won’t hurt most metal surfaces, but strong enough to conquer those stubborn burned-on globs.
Kitchen Gadget Hacks!
Your kitchen is your domain. Be the boss of it with these nifty gadget hacks!
 70. Create a recipe hanger. – Attach a rubber band to a binder clip and use it to hang recipes from cabinet knobs. For larger pages, use a pants hanger instead.
71. Keep dish sponges sanitary. – Stick them in a binder clip and stand them upright so your sponges stay clean and dry.
72. Keep cutting boards in place. – Put a damp dish towel between the board and counter top. This will keep the cutting board from sliding while you’re trying to work.
73. Safely store knives. – Stick an old wine cork on the point of the blade. Not only will this save you from potentially stabbing yourself, it will also keep the blades from rattling around in the drawer.
74. Put out grease fires. – If you don’t have an extinguisher ready available (which is always recommended) you can use baking soda to put out small grease fires.
75. Blender, grab-and-go – Replace your blender carafe with a jar. Sure this means you have to find one with threads to match your blender, but when you do you’ll have the perfect vessel for blending, sipping, and storing smoothies and other blended foods. Just remember: You’ll still need to use the rubber seal!
Clever Left-over Hacks!
No, it doesn’t mean we didn’t have a category for these clever hacks. It means these are clever ways to hack leftovers!
 76. Transform your left-overs. – Turn pasta, rice, meat, and other left-over foods into more food. Check out this awesome guide for crafting your own left-over casserole.
77. Reheat pizza the easy way. – Microwaves are notorious for turning pizza crust into bread-jerky. Here’s the secret: Set a cup of water in the machine with your delicious cheesy, bready goodness. This will keep the crust soft and moist during the reheating process.
78. Reheat bread the easy way. – Don’t break a tooth on rock-hard breadsticks or pull a jaw muscle on dinner roll-jerky. Drape a moist paper towel over your left-over breads while reheating in the microwave. This will keep them from drying out.
79. Reheat pasta the easy way. – If you’ve ever tried to microwave pasta left-overs, you know that they pretty much only have two temperatures: “still cold in the middle” or “fiery, screaming, tongue-searing hot.” Use this hack to defy the laws of microwaving: Arrange your left-over pasta in a ring along the outside of the plate. (The middle can’t still be cold if there is no middle!) Then all you have to do is check your pasta every thirty seconds or so and pull it out before it reaches stage 2.
80. Keep cake from going stale. – Use toothpicks to attach a piece of sliced bread to any exposed cake innards. The bread will go stale, but it will keep the cake underneath moist and delicious. See? You can have your (left-over) cake and eat it, too!


